Have you ever settled in for a movie night with your favorite film, only to be distracted by annoying green vertical lines on the projector screen? It’s a frustrating experience, that can make you ponder hard on the question; why does my projector have vertical lines? But fear not, because, we’ll delve into the reasons behind those vertical yellow lines on a projector screen and provide you with valuable insights on how to address this issue.
To understand the causes of vertical lines on your overhead projector, it’s important to keep in mind that projectors rely on different parts to produce clear images and issues can arise from the projector itself. So, it’s also crucial to differentiate first, between minor problems that can be easily fixed and more serious issues that may require professional assistance.
In the upcoming sections of this article, we’ll dive deeper into the potential causes of dlp projector vertical lines and discuss various troubleshooting steps to help you identify and resolve the issue. So, keep reading to discover the reasons behind your projector’s vertical lines and learn how to restore that pristine picture quality you deserve.
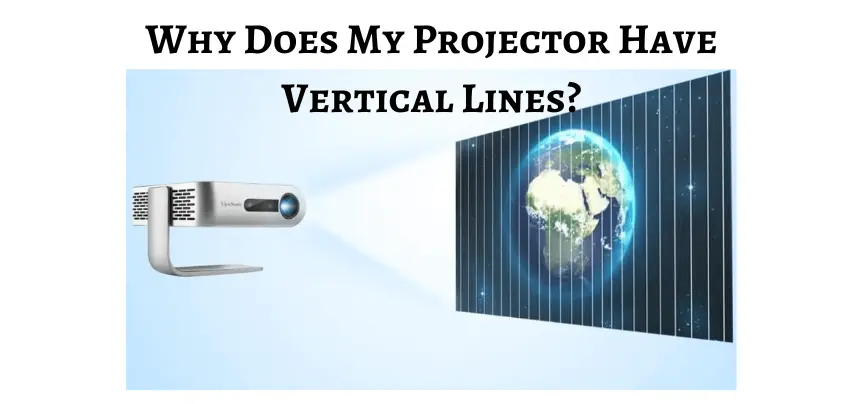
Why Does My Projector Have Vertical Lines?
If you’ve ever set up a projector in your home or office, you may have noticed that sometimes the image projected has vertical lines running through it. These lines can be distracting and take away from the quality of the image.
We’ll take a closer look at why your projector has vertical lines on the screen and some steps you can take to fix it. There can be several reasons why your projector is showing vertical lines. Here are a few of the most common:
1. Cable Connection Issues
One of the main reasons for vertical lines in the projector is loose or damaged cables. If the cables are not securely connected to the projector or the image source, it can result in a poor image display. It is essential to check the cables and make sure they are correctly connected.
2. Damaged Projector Lens
Another reason for vertical lines appearing on the projector is that the projector lens or mirror is damaged. The damage to the lens can be minor or major, affecting the quality of the image and causing vertical lines to appear on the screen.
3. Deteriorated Projector Bulb
A projector’s bulb also plays a vital role in the quality of the image produced. An old or deteriorating bulb can cause the projector to display vertical lines.
4. Display Settings
Incorrect display settings on your image source or projector can also cause vertical lines to appear. The aspect ratio, resolution, or refresh rate can be misconfigured, resulting in a distorted image and vertical lines appearing.
Also, click the below articles:
Best Projectors For Classroom
Best Lens Cleaners for Projectors
Best Projectors For Sports
Best Projectors For Wedding Receptions
Best Projectors For Ceiling Mounts
Best Projectors For Projection Mapping
How Do You Fix Vertical Lines On A Projector?
Does your projector have vertical lines on the screen? Are these dlp projector vertical lines disrupting your presentations or big game viewings? Don’t worry, you’re not alone. This is a common issue that can be caused by several factors. Fortunately, there are a variety of ways to solve the problem. Here are some steps to follow to fix the vertical lines on your projector.
1. Check the Cables
One of the most common causes of vertical lines on a projector is a faulty or damaged cable. Begin by ensuring that all cables are correctly connected and not kinked, frayed, or loose. Check that both the input and output cables are secure. This will help to remove any interference that could be causing the problem.
2. Clean the Lens and Filters
Over time, the lens of your projector can become dusty or smudged. If your lens is dirty, it may cause vertical lines, or interfere with the colors or brightness of your image. Clean the lens with a soft and dry cloth. Make sure that you don’t scratch the lens or remove any protective coatings. It’s also important to check and clean the filters regularly to prevent overheating and prolonged use.
3. Adjust The Projector Settings
Another option to fix vertical lines is to check the projector settings. The settings on your projector could be wrong or misaligned, disrupting the image. Begin by adjusting the contrast, brightness, and color settings. Move or adjust the lens shift or keystone settings, which can also cause interference.
4. Replace The Lamp
If the above solutions do not work, it may be time to replace the lamp. An old or damaged lamp can cause issues such as irregularities in an image, including vertical lines. A new bulb can be expensive, but it’s worth it if you want to maintain a good-quality display.
What Happens When Your Screen Has Lines?
So, what happens when your screen has lines? Well, watching movies and enjoying video games is all fun and stuff. However, when you start noticing lines on your projector screen, it can be quite distracting and impact your viewing experience.
But don’t worry, in this article, we’ll discuss the possible causes of lines appearing on a projector screen and how to address them. Several factors can contribute to lines appearing on your projector screen.
Here are a few common reasons why your projector has vertical lines on the screen;
1. Signal Interference
One of the main causes of lines on a projector screen is signal interference. This can occur if there are electronic devices emitting signals near the projector that are interfering with the smooth transmission of the video signal.
2. Connection Issues
Loose or faulty connections between the projector and the video source can also result in lines on the screen. This can happen if the cables aren’t securely plugged in or if the connectors are damaged.
3. Projector Settings
Improper settings on the projector can lead to lines on the screen. Adjustments such as brightness, contrast, or aspect ratio can affect the image quality and result in visible lines.
4. Defective Projector
In some cases, lines on the screen can indicate a defect in the projector itself. This might include issues with the projector’s internal components, such as the video processing unit or the LCD panels.
You may also like the following articles:
Best Projectors For Halloween Effects
Best Projectors For Cookie Decorating
Best Projectors For Camping
Best Projector For Daytime Use
Best Long Throw Projector For Distance
Best Short Throw Projector For Golf Simulator
Best 1080p Projectors Under 500 Dollars
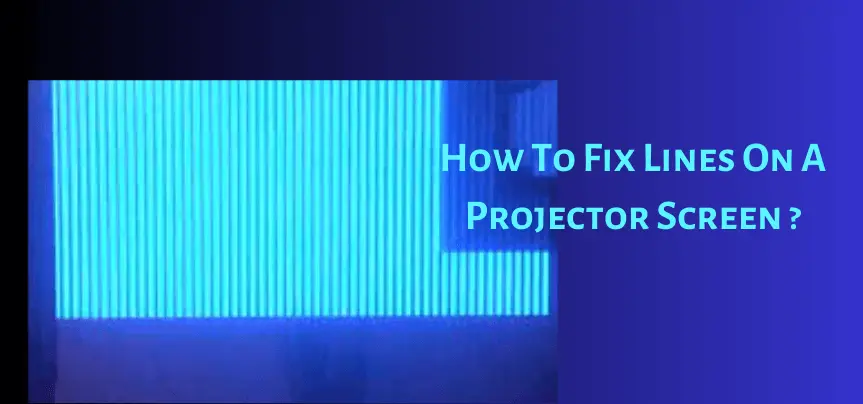
How To Fix Lines On A Projector Screen?
Addressing the issue of lines on a projector screen depends on the cause of the problem. Here are a few troubleshooting steps you can take:
1. Check And Reconnect Cables
Start by ensuring that all cables are properly connected. Disconnect and reconnect the video cables (HDMI, VGA, etc.) between the projector and the video source. Make sure they are firmly inserted on both ends.
2. Eliminate Signal Interference
To address signal interference, try moving any electronic devices away from the projector or turning them off. This includes devices like routers, wireless speakers, or other appliances that may be causing interference.
3. Adjust Projector Settings
Access the projector menu and navigate through the settings options. Adjust the brightness, contrast, and other related settings. Experiment with different configurations to see if it resolves the issue.
4. Seek Professional Assistance
If none of the above steps solve the problem, it might be necessary to consult a professional technician. They can examine the projector for any internal issues and provide appropriate repairs or replacements if required.
What Can Damage A Projector?
The projector is an electronic device and like any other device at your home or office, it too is suspectable to damage. But it’s important to learn what can damage a projector to protect and improve the working of your device.
So, in this portion of the article, we’ll be discussing some of the potential causes of projector damage.
1. Overheating
One of the most common causes of projector damage is overheating. Projectors generate a significant amount of heat during operation, which can lead to internal damage if not properly managed. Overheating can occur if the projector is used continuously for an extended period or if it is placed in a location with poor ventilation. To prevent overheating, make sure that the projector has enough space around it for proper air circulation. Clean the projector’s air filters regularly to remove dust and debris that can obstruct airflow.
2. Dust And Dirt
Dust and dirt are the enemies of projectors. When these particles accumulate on the lens or inside the projector, they can obstruct the light path and degrade the image quality. Over time, the dust can also cause damage to the internal components of the projector. To prevent dust and dirt from damaging your projector, keep the surrounding area clean and free from debris. Regularly clean the lens and projector housing using a soft cloth or a recommended cleaning solution.
3. Power Surges
Power surges can be detrimental to any electronic device, including projectors. A power surge occurs when there is a sudden increase in electrical voltage, which can damage the sensitive internal components of the projector. To protect your projector from power surges, use a surge protector or an uninterruptible power supply (UPS). These devices will regulate the electrical voltage and provide a stable power source for your projector.
4. Improper Handling
Improper handling of a projector can cause damage to its delicate components. Dropping the projector or mishandling it during transportation can result in internal damage or lens misalignment. Always follow the manufacturer’s instructions for handling the projector and use protective cases or bags when transporting it. Handle the projector with care, avoiding sudden movements or impacts.
5. Incorrect Installation
Incorrect installation of a projector can lead to various issues and potentially damage the device. Mounting the projector on an unstable surface or using improper mounting brackets can cause it to fall or vibrate excessively, resulting in internal damage. Improper positioning of the projector can also lead to distorted images or strain the lens mechanism. Always refer to the projector’s user manual for proper installation instructions and seek professional help if needed.
How Do You Fix A Distorted Projector Screen?
Have you ever encountered distorted images on a projector screen? Whether it’s minor blurring or significant stretching, these distortions can be bothersome. Fortunately, most of these issues can be easily resolved.
In this portion of the article, we will explore the primary causes of projector screen distortion and provide solutions on how do you fix a distorted projector screen.
1. Keystone Correction
One of the most common causes of distorted projector screens is keystone correction. This occurs when the projector is not aligned perpendicular to the screen, resulting in a trapezoidal distortion. Luckily, modern projectors come equipped with a keystone correction function to address this problem. To utilize keystone correction, access the projector’s menu and select the keystone correction option. From there, adjust the settings until the image on the projector screen appears correctly.
2. Aspect Ratio
The aspect ratio refers to the proportional relationship between the width and height of an image. If the aspect ratio of the projector does not match that of the screen, the image may appear distorted. Ensure that the aspect ratio of the projector matches the screen’s specifications. If not, adjust the settings in the projector’s menu accordingly to rectify the distortion.
3. Screen Warping
Distortion can also be caused by a warped projector screen. This may be due to the screen being either too loose or too tight. To address this issue, try tightening or loosening the screen until it becomes taut and flat. If the screen is excessively damaged or warped, it might be necessary to replace it.
4. Poor Focus
Blurry or unfocused images on the screen can lead to distortion. To resolve this problem, adjust the focus of the projector using the focus ring on the lens. Experiment with the focus until the image appears clear and sharp.
5. Poor Quality Cables
Using low-quality cables can introduce distortion into the projected image. Ensure that you use high-quality cables that are compatible with your projector. Additionally, check that all cables are securely plugged in and have not become loose over time.
By addressing these common causes of projector screen distortion, you can enjoy a clear and undistorted image for your presentations or entertainment.
Check these article also for more interesting information:
Best Mini Projector For Netflix
Best Mini Projector For MacBook Air
Best Projector For Dorm Room
Best Cheap Projector For PowerPoint Presentations
Best Projector For a Bright Room
Best Projector Under $200
Best Projector Under $300
Best Projectors Under $50
Can Projector Screen Be Repaired?
A good-quality projector screen can be expensive, and many people wonder whether it is possible to repair a damaged projector screen instead of having to buy a whole new one. The good news is that it is often possible to repair a projector screen, depending on the type and extent of damage.
Here, we are going to discuss the most common types of projector screen damage, whether they can be repaired, and how to make the projector clearer.
1. Tears Or Holes In The Screen
One of the most common types of damage to a projector screen is a tear or hole. These can be caused by various factors such as accidents, animal scratches, or simply wear and tear. A small tear or hole can be repaired with a simple patch kit that can be purchased from a hardware store. Simply cut the patch material to size and use an adhesive to stick it onto the damaged area. For larger tears or holes, it may be necessary to replace the entire screen fabric.
2. Wrinkles Or Creases
Another common issue with projector screens is wrinkles or creases, which can occur when the screen material is not stored properly or is not tensioned correctly. Fortunately, wrinkles and creases can often be fixed without having to replace the entire screen. To remove wrinkles, wet the affected area with water and place a damp cloth or towel on top. Use a hairdryer on a low heat setting to blow hot air onto the towel. This will cause the screen material to expand and the wrinkles to disappear. Alternatively, you can use a steamer to remove wrinkles from the screen.
3. Burn Marks
Burn marks on a projector screen can be caused by various factors, including a malfunctioning projector or other electrical equipment. Unfortunately, burn marks are often difficult to repair, and in most cases, the damaged area will need to be cut out and replaced with a patch. If the burn mark is minor, you can try to camouflage it by adjusting the projector’s settings or using a darker projection surface.
4. Fading Or Discoloration
Over time, projector screens can fade or become discolored, especially if they are exposed to direct sunlight. Fortunately, most cases of fading or discoloration can be fixed by simply washing the screen fabric with a soft cloth and a mild detergent. Be sure not to use any harsh chemicals or abrasive materials as this can lead to further damage.
How Do You Remove Fold Lines From A Projector Screen?
Projector screens are essential tools for creating immersive visual experiences in home theaters, conference rooms, and classrooms. However, one common issue that can detract from the viewing quality is fold lines. These lines occur when a projector screen has been folded for storage or transportation, resulting in creases that can affect the projection’s smoothness.
Thankfully, there are several methods available to remove fold lines and restore your projector screen’s pristine appearance. In this article, we will explore some effective techniques on how to remove waves from projector screens and enhance the viewing experience.
1. Unfolding And Stretching The Screen
The first step in removing fold lines is to unfold the screen completely and lay it flat. Gently stretch the screen across its length and width, smoothing out any creases with your hands. Take care not to apply excessive force that could damage the screen material. This method alone may be sufficient for minor fold lines, as gravity and tension help the screen regain its original shape.
2. Warm Air And Moisture
If the fold lines persist, utilizing warm air and moisture can be an effective solution. Set up a clothes steamer or a garment steamer and turn it on. Allow the steam to flow over the screen’s surface, focusing on the areas with fold lines. Move the steamer in a sweeping motion, maintaining a safe distance from the screen to prevent any water droplets from coming into contact with it. The steam’s heat and moisture will help relax the fabric and release the creases. After steaming, leave the screen to dry in a well-ventilated area.
3. Ironing
Ironing can be another useful technique for removing stubborn fold lines. Ensure that your projector screen material is suitable for ironing by checking the manufacturer’s guidelines. Set your iron to a low or medium heat setting without steam. Place a clean, thin cloth or a white cotton sheet over the screen to act as a protective barrier. Gently iron the cloth-covered surface, applying light pressure and moving the iron in slow, sweeping motions. Avoid leaving the iron in one spot for too long to prevent overheating or damaging the screen. Once you’ve ironed the entire surface, let the screen cool down and inspect it for any remaining fold lines.
4. Professional Steaming
For high-end or delicate projector screens, it may be wise to seek professional assistance. Some companies specialize in screen cleaning and restoration services. They employ advanced steaming techniques that ensure proper handling of the screen, eliminating fold lines without risking damage. Although this option may incur additional costs, it guarantees professional results and peace of mind.
FAQs
What Causes Lines In Projector?
Lines in a projector can be caused by various factors, including defective or misaligned pixels on the display panel, connectivity issues between the projector and the video source, a damaged or dirty lens distorting the image, overheating affecting internal components, problems with the DLP chip in DLP projectors, and incorrect projector settings like aspect ratio or resolution. To address this issue, it is advisable to check connections, clean the lens, ensure proper ventilation, adjust settings, and seek assistance from the manufacturer or a professional if the problem persists.
How Can I Make My Projector Stronger?
To make your projector stronger, follow these steps:
1) Increase brightness,
2) Improve contrast,
3) Invest in a high-quality projection screen,
4) Reduce ambient light,
5) Ensure proper positioning and alignment,
6) Regularly clean the lens,
7) Consider upgrading the bulb,
8) Optimize the video source.
These measures will enhance performance and brightness, improving your overall projector experience.
What Are The Rainbow Lines On Projector?
The rainbow lines on a projector are caused by the color wheel in single-chip DLP projectors. They appear as moving lines or color bands when the viewer’s eyes detect the sequential display of primary colors. While not everyone perceives these lines, some may find them distracting. In such cases, exploring projectors with alternative technologies may be beneficial.
Does Projector Screen Affect Quality?
Yes, the projector screen can significantly affect the quality of the projected image. A high-quality projector screen with good reflection properties and appropriate gain can enhance the brightness, contrast, and overall image clarity. It can also improve color reproduction, and viewing angles, and reduce issues like hot spotting or uneven light distribution.
On the other hand, a low-quality or improperly chosen screen may result in a dimmer or washed-out image, reduced contrast, and potential artifacts like moiré patterns. Therefore, selecting a suitable projector screen that complements the capabilities of your projector can have a noticeable impact on the quality of the projected visuals.
What Projector Settings For Best Picture?
For the best picture quality on a projector, consider adjusting the brightness, contrast, aspect ratio, color settings, and sharpness, and enabling image enhancement features. Use predefined color profiles or calibration tools for accurate color reproduction, and experiment with settings while viewing different content to find the optimal picture quality that suits your preferences.
Conclusion
In summary, if your projector is displaying vertical lines, there are several potential causes to consider. Checking and securing cables, addressing a faulty DMD chip, managing environmental factors, and updating software or firmware can help resolve the issue. By understanding these causes and taking appropriate troubleshooting steps, you can restore your projector’s performance and enjoy a clear and uninterrupted viewing experience. Seeking professional assistance may be necessary if the problem persists.

Needed to create you the very small note just to say thank you once again relating to the gorgeous methods you’ve shared in this case. This is so remarkably generous of you to allow unhampered exactly what a lot of people might have offered for sale for an e book to earn some money for their own end, certainly seeing that you could have tried it in case you decided. Those pointers in addition worked to become good way to know that someone else have the same zeal like my own to figure out much more in terms of this problem. I’m sure there are thousands of more enjoyable sessions in the future for individuals who read carefully your blog post.
I want to show thanks to this writer for bailing me out of such a trouble. Because of looking out through the world-wide-web and finding notions that were not productive, I assumed my entire life was gone. Living devoid of the solutions to the issues you have sorted out all through the report is a serious case, and the ones which might have in a wrong way damaged my entire career if I hadn’t discovered your blog post. Your good understanding and kindness in handling all the pieces was excellent. I’m not sure what I would have done if I hadn’t discovered such a subject like this. It’s possible to at this moment look forward to my future. Thank you very much for this professional and results-oriented guide. I won’t hesitate to refer your web page to anybody who desires guidelines on this subject.